Maximize Storage and Efficiency with a 20-Foot Shipping Container Garage
Whether you’re a homeowner looking for additional storage space or a business owner in need of a convenient and cost-effective solution for storing equipment and inventory, a 20-foot shipping container garage can be the perfect solution. These versatile structures offer a wide range of benefits, allowing you to maximize storage capacity and improve efficiency. In this blog post, we will explore the various advantages of using a shipping container garage and how it can revolutionize your storage needs.
1. Ample Storage Space
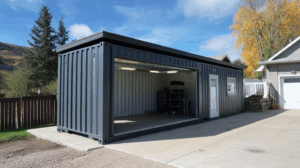
One of the primary advantages of a 20-foot shipping container garage is the significant amount of storage space it provides. With dimensions of 20 feet in length, 8 feet in width, and 8 feet 6 inches in height, you have ample room to store a wide variety of items. From household belongings and seasonal decorations to large equipment and vehicles, you can easily accommodate your storage needs within this compact yet roomy structure.
2. Secure and Weather-Resistant
Shipping containers are designed to withstand the harshest weather conditions and protect their contents. Made from durable steel, these containers are highly secure, keeping your belongings safe from theft and vandalism. Additionally, they are resistant to extreme temperatures, moisture, and pests, ensuring that your stored items remain in pristine condition. With a shipping container garage, you can have peace of mind knowing that your valuable possessions are well-protected.
3. Versatility and Customization Options
Shipping container garages offer incredible versatility and can be easily customized to suit your specific needs. From shelving units and workbenches to lighting and electrical outlets, you can transform your container into a functional workspace or storage area. You can also choose to add windows, ventilation systems, or insulation, depending on your requirements. The ability to customize your shipping container garage allows you to create a space that perfectly accommodates your storage and operational needs.
4. Mobility and Portability
Another advantage of using a shipping container garage is its mobility and portability. Unlike traditional garages or storage units, these containers can be easily transported from one location to another, making them an excellent choice for homeowners or businesses that may need to relocate in the future. Additionally, their standardized dimensions allow for easy transportation on trucks, ships, or trains, providing a convenient storage solution that can move with you.
5. Cost-Effective Solution
Compared to constructing a traditional garage or renting a storage unit, a shipping container garage offers a cost-effective alternative. The initial investment in purchasing a shipping container is typically lower, and the ongoing maintenance costs are minimal. Additionally, you can avoid monthly rental fees associated with external storage units, making it a cost-efficient solution in the long run.
6. Eco-Friendly Option
In today’s world, finding eco-friendly solutions is becoming increasingly important. Shipping container garages offer a sustainable storage option by repurposing retired containers that would otherwise go to waste. By utilizing these containers, you are contributing to the reduction of construction waste and the preservation of natural resources. It’s a win-win situation; you get a functional storage space while making a positive impact on the environment.
In conclusion, a 20-foot shipping container garage is an excellent choice for individuals and businesses looking to maximize storage capacity and improve efficiency. With ample storage space, security, customization options, mobility, cost-effectiveness, and eco-friendliness, these structures provide a range of benefits that traditional garages or storage units cannot match. Consider investing in a shipping container garage and unlock the potential for efficient and secure storage solutions.
Unleash Your Creativity: Inspiring Ideas for a 20-Foot Shipping Container Garage
Are you in need of some extra space for your hobbies, a home office, or perhaps a workshop? Look no further than a 20-foot shipping container garage! These versatile structures have gained popularity in recent years due to their durability, affordability, and ease of customization. With a little creativity and planning, you can transform a simple shipping container into a functional and inspiring space that reflects your unique style. In this blog post, we will explore some inspiring ideas to help you unleash your creativity and make the most of your 20-foot shipping container garage.
1. Home Workshop
If you are a DIY enthusiast, hobbyist, or simply need a dedicated space for your tools and projects, a shipping container garage can be the perfect solution. With its sturdy structure and ample space, you can create a functional workshop tailored to your specific needs. Install workbenches, shelves, and storage solutions to keep your tools organized and easily accessible. Consider adding adequate lighting and ventilation to ensure a comfortable and safe working environment. Don’t forget to personalize the space with inspiring artwork and motivational quotes to keep your creativity flowing!
2. Home Gym
Why spend money on a gym membership when you can have your very own workout space in your backyard? A shipping container garage can be transformed into a compact and efficient home gym. Install rubber flooring for shock absorption, mirrors to check your form, and versatile fitness equipment such as dumbbells, resistance bands, and a pull-up bar. Consider painting the walls in vibrant colors to energize your workouts. With a dedicated space just steps away from your home, staying fit and healthy has never been more convenient.
3. Art Studio
For all the artists and creators out there, a shipping container garage can be the perfect blank canvas for your art studio. The robust structure of the container provides a secure and weather-resistant space to unleash your creativity. Set up easels, paint racks, and storage solutions for your art supplies. Maximize natural light by adding large windows or skylights, or install adjustable lighting fixtures to create the perfect ambiance for your artistic endeavors. Fill the space with inspiring artwork, sculptures, and plants to create a serene and inspiring environment.
4. Home Office
With the rise of remote work and freelancing, having a dedicated home office is becoming increasingly important. A shipping container garage can be converted into a stylish and functional workspace that allows you to separate your work life from your home life. Install a desk, ergonomic chair, and storage solutions to keep your documents and supplies organized. Enhance productivity by adding a whiteboard or corkboard for brainstorming and task management. Consider incorporating natural elements such as plants and natural light to create a calming and productive atmosphere.
5. Entertainment Room
Why not create your own entertainment hub by transforming a shipping container garage into a cozy and inviting space for movie nights, game sessions, or simply hanging out with friends and family? Install comfortable seating, a large screen or projector, and a sound system to create an immersive entertainment experience. Add a mini-fridge, a popcorn machine, and a bar area for snacks and drinks. Customize the walls with your favorite movie posters or artwork to give the space a personal touch. This versatile space will surely become the go-to spot for fun and relaxation.
In conclusion, a 20-foot shipping container garage offers endless possibilities for creative and functional spaces. Whether you’re in need of a workshop, gym, art studio, home office, or entertainment room, with a little imagination and planning, you can transform a simple container into a personalized haven. So, unleash your creativity and make the most of your shipping container garage – the possibilities are only limited by your imagination!
The Ultimate Guide to Building a 20-Foot Shipping Container Garage
Are you in need of extra storage space or a workshop but don’t have the budget or time to build a traditional garage? Look no further than a 20-foot shipping container garage! These versatile and durable structures can be converted into a functional and cost-effective solution for all your storage needs. In this ultimate guide, we will walk you through the step-by-step process of building your very own shipping container garage.
Step 1: Planning and Preparation
Before you start your project, it’s important to have a clear plan in mind. Consider the purpose of your garage and what you will be storing inside. Measure the available space on your property to ensure that a 20-foot shipping container will fit comfortably. Check local building codes and regulations to make sure you comply with any necessary permits or restrictions.
Step 2: Choosing the Right Container
When selecting a shipping container, it’s essential to find one in good condition. Look for containers that are wind and watertight, with minimal rust or damage. Consider purchasing a used container from a reputable seller, as they are often more affordable than new ones. Inspect the container thoroughly to ensure it is structurally sound and free from any hazardous materials.
Step 3: Site Preparation
Prepare the area where you plan to install your shipping container garage. Clear the ground of any debris or vegetation and level the surface. Lay down a foundation of concrete footings or piers to provide stability and prevent moisture buildup. This will also protect your container from rust and corrosion.
Step 4: Modifications and Insulation
To make your shipping container garage more functional, you will need to make some modifications. Cut openings for windows, doors, and ventilation. Install a garage door that suits your needs and ensure proper insulation to regulate temperature and prevent condensation. Use spray foam insulation or add a layer of insulation panels to the interior walls and ceiling.
Step 5: Electrical and Plumbing
If you plan to use your shipping container garage as a workshop or storage space, consider adding electrical and plumbing systems. Hire a licensed electrician to install wiring and outlets for lighting, power tools, and other electrical devices. If required, consult a plumber to add water lines and drains for sinks or toilets.
Step 6: Interior Design and Organization
Once the basic structure and utilities are in place, it’s time to think about the interior design and organization of your shipping container garage. Consider adding shelves, cabinets, and workbenches to maximize storage and workspace. Utilize wall-mounted storage solutions to keep your tools and equipment organized and easily accessible.
Step 7: Security and Safety
To ensure the safety and security of your shipping container garage, install proper locking mechanisms on doors and windows. Consider adding security cameras or an alarm system for added protection. Install smoke detectors and fire extinguishers to meet safety standards and prevent accidents.
Step 8: Maintenance and Upkeep
Regular maintenance is crucial to keep your shipping container garage in good condition. Inspect the structure for any signs of rust or damage and address them promptly. Clean the interior and exterior regularly to prevent dirt and debris buildup. Apply a fresh coat of paint or rust-resistant coating as needed to protect the container from the elements.
Conclusion
Building a 20-foot shipping container garage can be a cost-effective and practical solution for additional storage or workspace. With proper planning, preparation, and a little creativity, you can transform a humble shipping container into a functional and stylish garage. Follow this ultimate guide to ensure a successful project and enjoy the benefits of your custom-made shipping container garage for years to come.
Transform Your Space: How to Create a Stylish 20-Foot Shipping Container Garage
If you’re looking for an innovative and unique way to add extra storage or create a stylish workspace, look no further than a 20-foot shipping container garage. These versatile containers can be transformed into a functional and aesthetically pleasing garage that not only serves its intended purpose but also adds a touch of modernity to your property. In this blog post, we’ll explore the steps you can take to create your very own stylish shipping container garage.
Step 1: Choose the Right Container
The first step in creating your shipping container garage is to choose the right container. Opting for a 20-foot container ensures you have enough space for your vehicles or storage needs, while still being manageable in terms of size. Consider factors such as the condition of the container, its structural integrity, and whether it has been properly inspected and certified.
Step 2: Plan the Layout
Before diving into the transformation process, it’s important to plan the layout of your garage. Consider factors such as the number of vehicles you wish to store, the space required for additional storage or work areas, and any specific amenities you’d like to include. This planning phase will help you make the most efficient use of the available space and ensure your garage meets your specific needs.
Step 3: Insulation and Ventilation
To create a comfortable and climate-controlled environment within your shipping container garage, it’s crucial to insulate and ventilate the space. Insulation helps regulate the temperature and prevents condensation, while ventilation ensures adequate airflow. There are various insulation and ventilation options available, so be sure to choose the ones that best suit your location and climate.
Step 4: Flooring and Lighting
Next, focus on the flooring and lighting of your garage. Consider installing a durable and easy-to-clean flooring material, such as epoxy or rubber tiles, that can withstand heavy use. Adequate lighting is essential for a functional workspace, so opt for energy-efficient LED lights that provide ample brightness.
Step 5: Customization and Security
This is where you can let your creativity shine and make your shipping container garage truly unique. Consider customizing the exterior with a fresh coat of paint, adding windows or skylights for natural light, or incorporating a sliding door for easy access. Additionally, prioritize security by installing sturdy locks, security cameras, or an alarm system to protect your valuable possessions.
Step 6: Utilities and Amenities
To make your shipping container garage a fully functional space, think about the utilities and amenities you’ll need. If you plan to use it as a workshop, ensure you have access to electricity for power tools. If you’ll be spending long hours in your garage, consider installing heating and cooling systems to maintain a comfortable temperature year-round. Don’t forget about plumbing needs, such as sinks or toilets, if required.
Step 7: Organization and Storage Solutions
Finally, maximize the efficiency and functionality of your garage by incorporating smart organization and storage solutions. Utilize wall-mounted shelves, pegboards, or overhead racks to keep your tools and equipment neatly organized. Consider installing a workbench or designated work area to enhance productivity and create a dedicated space for DIY projects.
Conclusion
Transforming a 20-foot shipping container into a stylish garage is an exciting endeavor that allows you to blend functionality with creativity. By following these steps and carefully planning your layout, insulation, lighting, customization, and amenities, you can create a remarkable space that not only meets your storage and workspace needs but also adds a touch of modern style to your property. So, roll up your sleeves, unleash your creativity, and embark on the journey of transforming your space with a 20-foot shipping container garage.
From Box to Garage: Designing and Constructing a 20-Foot Shipping Container Conversion

When it comes to creative and innovative solutions for additional space, shipping container conversions have become increasingly popular. These versatile structures offer a cost-effective and eco-friendly alternative to traditional construction methods. One common application is using shipping containers to create a garage space. In this blog post, we will explore the process of designing and constructing a 20-foot shipping container conversion into a functional and stylish garage.
Step 1: Planning and Design
Before starting any construction project, careful planning and design are essential. When converting a shipping container into a garage, you need to consider the following factors:
Purpose and Functionality
Determine how you plan to use the garage space. Will it be solely for vehicle storage, or will it also serve as a workshop or storage area? Understanding the purpose of the space will help guide your design decisions.
Size and Layout
Shipping containers come in various sizes, but a 20-foot container is a common choice for a garage conversion. Consider the dimensions of your vehicles and any additional equipment you plan to store in the garage to determine the optimal layout.
Permits and Regulations
Check with your local authorities regarding any permits or regulations required for converting a shipping container into a garage. It’s crucial to ensure compliance with zoning laws, building codes, and any other relevant regulations.
Insulation and Ventilation
Shipping containers are made of steel, which can make them susceptible to extreme temperatures. Proper insulation and ventilation are critical to ensure a comfortable and climate-controlled environment inside the garage.
Step 2: Preparing the Container
Once you have a clear design plan in place, it’s time to prepare the shipping container for conversion:
Cleaning and Inspection
Thoroughly clean the container, removing any debris, rust, or other contaminants. Conduct a detailed inspection to identify any structural issues that need to be addressed before proceeding with the conversion.
Cutting Openings
Decide on the location and size of doors, windows, and other openings. Use appropriate tools, such as a plasma cutter, to cut the necessary openings while ensuring structural integrity.
Reinforcing the Structure
To compensate for the removed sections of the container, reinforce the remaining structure with additional steel beams or plates. This step is crucial to maintain the container’s structural integrity and ensure its long-term durability.
Step 3: Installation and Customization
With the container properly prepared, it’s time to start the installation and customization process:
Flooring and Insulation
Install a suitable flooring system that can withstand the weight of vehicles and provide a level surface. Apply insulation materials to the walls, ceiling, and floor to regulate temperature and minimize condensation.
Electrical and Plumbing
Plan and install electrical wiring, outlets, and lighting fixtures to meet your garage’s specific needs. If necessary, consider adding plumbing for a sink, toilet, or other amenities you might require.
Interior Finishes
Choose appropriate interior finishes that align with your desired aesthetic and functionality. Consider durable materials like plywood or metal for the walls, and epoxy or concrete for the floor, ensuring they can withstand the demands of a garage environment.
Security and Access
Install secure doors and windows to protect your vehicles and belongings. Consider adding security systems, such as alarms or surveillance cameras, to enhance the safety of your garage.
Step 4: Exterior Enhancements
To complete the shipping container conversion into a garage, focus on the exterior enhancements:
Painting and Coating
Apply a suitable paint or coating to protect the container from rust and corrosion. Choose a color that complements your surroundings or matches your personal taste.
Roofing and Drainage
Ensure the container has a reliable and efficient roofing system to prevent water leaks. Consider installing gutters and downspouts to direct rainwater away from the garage.
Landscaping and Integration
Integrate the converted shipping container into your property’s overall landscape design. Consider adding pathways, plants, or other features to enhance the aesthetic appeal of your garage.
Conclusion
Converting a 20-foot shipping container into a garage requires careful planning, design, and execution. With the right approach, you can transform a simple metal box into a functional and stylish space that meets your unique needs. Whether you need extra storage for vehicles, a workshop, or a combination of both, a shipping container conversion offers a cost-effective and sustainable solution. So, roll up your sleeves, gather your tools, and embark on the exciting journey of transforming a shipping container into your dream garage.