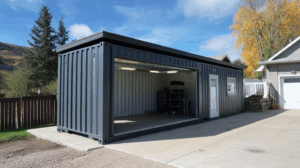
How to Design and Build the Perfect Garage Shipping Container Workshop
Are you a DIY enthusiast or a professional looking for a versatile and functional space to work on your projects? Look no further than a garage shipping container workshop! Shipping containers have gained popularity as an affordable and customizable option for building workshops, and their sturdy structure makes them a perfect choice.
In this blog post, we will guide you through the process of designing and building the perfect garage shipping container workshop. From planning and layout to insulation and electrical work, we’ve got you covered. So, let’s dive in!
Step 1: Planning and Layout
Before you start building your workshop, it’s crucial to plan and determine the layout that suits your needs. Consider factors such as the size of the shipping container, the type of projects you’ll be working on, and the equipment and tools you’ll need.
Measure the available space and create a floor plan to visualize how you will arrange your workstations, storage areas, and any additional features like a bathroom or office space. Take into account proper ventilation and lighting to ensure a comfortable and safe working environment.
Step 2: Insulation and Climate Control
To make your workshop comfortable year-round, insulating the shipping container is essential. Start by selecting the right insulation material suited for your climate and budget. Common options include spray foam insulation, rigid foam insulation, or fiberglass batt insulation.
Apply insulation to the walls, ceiling, and floor of the shipping container, ensuring a tight seal to prevent any air leaks. This will help regulate the temperature inside and keep it comfortable during hot summers and cold winters.
Step 3: Electrical and Lighting
Next, it’s time to tackle the electrical work. Hire a licensed electrician to handle this step, as it requires expertise and adherence to local building codes. You’ll need to plan for sufficient power outlets, lighting fixtures, and any specialty electrical needs based on your workshop requirements.
Ensure that the electrical system can handle the load of your tools and equipment. Consider installing task lighting above workstations and general lighting throughout the workshop to ensure visibility and productivity.
Step 4: Workbench and Storage Solutions
To maximize efficiency, invest in a sturdy workbench that suits your needs. Whether you prefer a traditional wooden workbench or a customized metal one, make sure it provides ample space for your projects and includes storage solutions like drawers or shelves.
Utilize the vertical space by installing wall-mounted storage systems for tools, equipment, and materials. Pegboards, shelving units, and cabinets are excellent options for keeping your workshop organized and clutter-free.
Step 5: Safety and Security
When designing your garage shipping container workshop, prioritize safety and security. Install fire extinguishers and smoke detectors in strategic locations. Consider installing security measures like an alarm system and sturdy locks to protect your valuable tools and equipment.
Additionally, ensure proper ventilation to remove fumes and dust particles generated during your projects. Invest in a good quality dust collection system to maintain air quality and minimize health risks.
Step 6: Personalization and Aesthetics
Lastly, don’t forget to add a personal touch and make your workshop an inspiring space. Paint the walls in a color that boosts your creativity and motivation. Hang up posters or artwork that reflects your interests and passions.
Consider adding a comfortable seating area or a small break space to take short breaks and recharge. And don’t overlook the importance of natural light – if possible, add windows or skylights to bring in natural daylight.
Conclusion
Designing and building the perfect garage shipping container workshop requires careful planning, attention to detail, and a clear understanding of your specific needs. By following the steps outlined in this blog post, you’ll be well on your way to creating a functional and inspiring workspace that enhances your projects and creativity.
Remember, a well-designed workshop not only improves your productivity but also provides a sanctuary for your creativity and passion. So, roll up your sleeves, grab your tools, and start building your dream garage shipping container workshop today!
From Garage to Guesthouse: Turning a Shipping Container into Cozy Accommodation
Have you ever dreamed of transforming a simple shipping container into a stylish and comfortable guesthouse? Well, this innovative trend is taking the world of architecture and design by storm. From humble beginnings as storage units in shipping yards, these containers are being repurposed and converted into unique and eco-friendly accommodations. In this blog post, we will explore the process of turning a shipping container into a cozy guesthouse and discover why this trend is gaining popularity.
The Appeal of Shipping Container Guesthouses
The idea of repurposing shipping containers into guesthouses has gained traction for several reasons. First and foremost, these containers are readily available and relatively inexpensive compared to traditional building materials. They are also durable, weather-resistant, and can be easily transported to any location, making them ideal for creating temporary or mobile accommodations.
Another reason for their popularity is their eco-friendly nature. By repurposing shipping containers, we are reducing waste and giving new life to materials that would otherwise end up in landfills. Additionally, the compact size of these containers encourages minimalism and forces us to think creatively about space utilization.
Designing the Perfect Container Guesthouse
The process of transforming a shipping container into a cozy guesthouse involves careful planning and innovative design. Here are some key considerations to keep in mind:
1. Size and Layout
Shipping containers come in standard sizes, typically 20 or 40 feet long, 8 feet wide, and 8.5 feet tall. These dimensions provide a solid foundation for designing your guesthouse. Determine how many containers you will need based on the desired size and layout. Keep in mind that multiple containers can be stacked or joined together to create a larger space.
2. Insulation and Climate Control
To ensure comfort throughout the year, proper insulation is essential. Shipping containers are made of metal, which can make them susceptible to extreme temperatures. Insulating the walls, ceiling, and floor will help regulate the interior temperature and prevent condensation. Additionally, installing windows and ventilation systems will allow for natural light and fresh air circulation.
3. Plumbing and Electrical Systems
Consider your guesthouse’s amenities and determine whether you will need plumbing and electrical systems. These can be installed within the container, but it is important to consult with professionals to ensure safety and compliance with building codes. Planning the layout in advance will help determine the best locations for fixtures and outlets.
4. Functional and Stylish Interior
The limited space of a shipping container requires thoughtful interior design to maximize functionality and comfort. Utilize multipurpose furniture and built-in storage solutions to make the most of the available space. Opt for light colors and clever lighting to create an open and inviting atmosphere. Incorporate personal touches through artwork, textiles, and decor to give the space a warm and welcoming vibe.
5. Outdoor Living Space
Don’t forget to consider the exterior of your container guesthouse. Create an inviting outdoor living space with a patio or deck, allowing guests to enjoy the surrounding environment. Add some greenery with potted plants or vertical gardens to enhance the aesthetics and connect the guesthouse with nature.
Benefits of a Shipping Container Guesthouse
Turning a shipping container into a cozy guesthouse offers numerous benefits. Here are a few to consider:
- Affordability: Compared to traditional construction, repurposing a shipping container is a cost-effective way to create accommodations.
- Mobility: Shipping container guesthouses can be easily transported if you decide to relocate or move your business.
- Sustainability: By repurposing materials and embracing a minimalist lifestyle, you contribute to a more sustainable future.
- Unique Experience: Guests will be intrigued by the novelty and ingenuity of staying in a converted shipping container, creating a memorable experience.
Conclusion
The transformation of a shipping container into a cozy guesthouse is an innovative and sustainable approach to accommodation. With careful planning and creative design, these repurposed containers offer a unique and comfortable space for guests. Whether you are considering a backyard guesthouse or a mobile vacation rental, the possibilities are endless. Embrace the trend and embark on a journey from a humble garage to a charming guesthouse.
The Ultimate Guide to Transforming a Garage Shipping Container into Your Dream Space
Are you in need of some extra space for storage, a workshop, or even a cozy office? Look no further than a garage shipping container! These versatile containers can be easily transformed into your dream space with a little creativity and some DIY skills. In this ultimate guide, we will take you through the step-by-step process of transforming a garage shipping container into a functional and stylish area that suits your needs.
Step 1: Planning and Design
Before starting any project, it’s crucial to have a clear plan and design in mind. Consider the purpose of your space and how you envision it. Will it be a home gym, an artist’s studio, or a music room? Take measurements of the container and sketch out a layout that includes the necessary features and amenities. This will help you stay organized and focused throughout the transformation process.
Step 2: Insulation and Ventilation
Shipping containers are typically made of steel, which can make them extremely hot during summer months and frigid in winter. To ensure year-round comfort, proper insulation and ventilation are essential. Start by insulating the walls, ceiling, and floor with materials like foam board or spray foam insulation. Next, install windows and vents to allow for airflow and to prevent condensation buildup.
Step 3: Electrical and Plumbing
If your dream space requires electricity or plumbing, this is the time to tackle those installations. Hire a licensed electrician to wire your container with outlets, lighting fixtures, and any other electrical needs. For plumbing, consult with a professional to determine the best approach based on your space’s requirements. Whether it’s a sink, toilet, or shower, ensure that all plumbing is correctly installed and up to code.
Step 4: Flooring and Wall Coverings
To make your dream space feel more inviting, choose appropriate flooring and wall coverings. For the floor, consider options like laminate, vinyl, or even epoxy coatings for a sleek and durable finish. As for the walls, you can opt for drywall or paneling for a more traditional look, or add an industrial touch with corrugated metal or reclaimed wood. Be sure to seal and paint the walls to protect them from moisture and enhance the overall aesthetic.
Step 5: Lighting and Fixtures
Lighting plays a crucial role in creating the right atmosphere in your dream space. Install a combination of ambient, task, and accent lighting to suit your needs. Pendant lights, track lighting, or even recessed lights can add both functionality and style. Additionally, choose fixtures that complement the overall design theme of your space, whether it’s modern, rustic, or eclectic.
Step 6: Furnishing and Storage
Now that the basic structure of your dream space is complete, it’s time to furnish and organize it. Consider versatile and space-saving furniture options that can serve multiple purposes, such as foldable tables or built-in storage solutions. Make the most of your vertical space by installing shelves, hooks, and cabinets to keep your belongings organized and easily accessible.
Step 7: Personalization and Finishing Touches
To truly make your dream space your own, add personal touches and finishing details. Paint the exterior of the container in a color that matches your style or adds a pop of vibrancy. Hang artwork, add plants, and incorporate decorative elements that reflect your personality. Don’t forget about window treatments and curtains to add privacy and control natural light.
Step 8: Outdoor Space
If your garage shipping container has outdoor space surrounding it, take advantage of it! Create a cozy patio area with outdoor seating, potted plants, and even a fire pit. This extension of your dream space will allow you to enjoy the outdoors while still having all the comforts of your indoor sanctuary.
Transforming a garage shipping container into your dream space may require some time, effort, and creativity, but the end result will be well worth it. By following this ultimate guide, you’ll have a functional and stylish space that suits your needs and reflects your personality. So, roll up your sleeves, gather your tools, and get ready to bring your dream space to life!
The Pros and Cons of Using a Garage Shipping Container for Extra Storage
When it comes to extra storage space, many homeowners and businesses are turning to unconventional options to meet their needs. One such option that has gained popularity in recent years is using a garage shipping container. These large metal containers, originally designed for transporting goods, can be repurposed as storage units. While there are several advantages to using a garage shipping container for extra storage, there are also a few drawbacks to consider. In this blog post, we will explore both the pros and cons of using a garage shipping container for extra storage.
Pros of Using a Garage Shipping Container for Extra Storage
1. Affordability
Garage shipping containers are often more affordable than traditional storage solutions. Instead of paying monthly rental fees for a storage unit, purchasing a shipping container upfront can be a cost-effective long-term investment. Additionally, since shipping containers are built to withstand harsh weather conditions and transportation, they are durable and require minimal maintenance, saving you money in the long run.
2. Versatility
One of the biggest advantages of using a garage shipping container for extra storage is its versatility. These containers come in various sizes, ranging from 10 to 40 feet in length, allowing you to choose the size that best fits your storage needs. Furthermore, shipping containers can be easily customized and modified to suit your specific requirements. You can add shelves, dividers, or even insulation to create an organized and climate-controlled storage space.
3. Security
Shipping containers are designed to withstand rough handling and are made from sturdy steel, making them highly secure storage options. They are typically equipped with lockable doors and heavy-duty locks, providing an extra layer of security for your belongings. Additionally, since the containers are made from steel, they are resistant to fire, pests, and other potential hazards, ensuring that your stored items remain safe and protected.
4. Mobility
Unlike traditional storage units, garage shipping containers offer the advantage of mobility. If you ever need to move your storage unit to a different location, it can easily be transported using a truck or crane. This flexibility is especially beneficial for businesses or individuals who frequently change locations or require temporary storage during a moving process.
Cons of Using a Garage Shipping Container for Extra Storage
1. Space Limitations
While garage shipping containers come in various sizes, they still have space limitations compared to other storage options. If you have large or bulky items to store, such as furniture or vehicles, you may find it challenging to fit everything into a standard-sized container. In such cases, you may need to consider multiple containers or explore alternative storage solutions.
2. Limited Accessibility
Another drawback of using a garage shipping container for storage is the limited accessibility it offers. Since these containers are designed for transportation rather than frequent access, they typically have only one entry point. This can make it difficult to access items stored at the back of the container without rearranging the entire contents. If frequent access to your stored items is essential, you may want to consider alternative storage options.
3. Lack of Climate Control
Most garage shipping containers do not come with built-in climate control systems. This means that if you need to store temperature-sensitive items, such as electronics, artwork, or documents, you may need to invest in additional climate control equipment, such as air conditioning or insulation. Without proper climate control measures, extreme temperatures and humidity levels inside the container can cause damage to your stored items.
4. Zoning and Permitting Restrictions
Before purchasing a garage shipping container for extra storage, it is important to research and understand the zoning and permitting restrictions in your area. Some neighborhoods or municipalities may have regulations in place that restrict the use of shipping containers for storage purposes. It is crucial to ensure that you comply with all local regulations before investing in a garage shipping container.
In conclusion, using a garage shipping container for extra storage offers several advantages, including affordability, versatility, security, and mobility. However, it also comes with limitations, such as space constraints, limited accessibility, lack of climate control, and potential zoning restrictions. Before making a decision, it is essential to carefully evaluate your storage needs and consider both the pros and cons of using a garage shipping container.
10 Creative Uses for Garage Shipping Containers You Haven’t Thought Of
Garage shipping containers are not just for storing your extra belongings or protecting your vehicles. These versatile and sturdy structures can be transformed into a variety of creative spaces that serve a multitude of purposes. From unique living spaces to innovative business setups, the possibilities are endless. In this blog post, we will explore 10 creative uses for garage shipping containers that you may not have thought of before.
1. Home Office or Studio
In today’s remote work era, having a dedicated space to focus and be productive is essential. Converting a shipping container into a home office or studio provides a separate and private area away from the distractions of your home. With proper insulation and electrical installations, you can create a comfortable and inspiring workspace that enhances productivity and creativity.
2. Gym or Fitness Center
If you’re a fitness enthusiast or a personal trainer looking for a unique workout space, consider utilizing a garage shipping container. These containers can be transformed into compact and fully functional gyms or fitness centers. Install mirrors, rubber flooring, and specialized equipment to create a customized space that caters to your specific fitness needs.
3. Garden Shed or Greenhouse
Shipping containers provide an excellent solution for gardeners who need storage space or a protected environment for their plants. By adding windows, ventilation systems, and shelves, you can convert a shipping container into a garden shed or even a small greenhouse. This not only keeps your gardening tools organized but also protects your plants from harsh weather conditions.
4. Art Gallery or Exhibition Space
For artists looking for an unconventional gallery space, garage shipping containers offer a blank canvas to showcase their work. With proper lighting and display systems, you can transform a container into an intimate art gallery or exhibition space. These portable galleries can be easily transported to different locations, allowing you to reach a wider audience.
5. Pop-up Shop or Retail Store
Entrepreneurs and small business owners are always on the lookout for cost-effective and flexible retail spaces. Garage shipping containers provide an ideal solution for pop-up shops or retail stores. With minimal modifications, you can create an attractive and functional storefront that stands out from traditional brick-and-mortar establishments.
6. Coffee Shop or Food Stand
The popularity of food trucks and outdoor coffee shops has skyrocketed in recent years. By converting a garage shipping container, you can create a trendy and unique coffee shop or food stand. Add a serving window, counters, and seating areas to provide a cozy space for customers to enjoy their favorite beverages or snacks.
7. Workshop or Maker Space
Whether you’re a hobbyist or a professional craftsman, a garage shipping container can be transformed into the perfect workshop or maker space. Equip it with workbenches, tool storage, and proper lighting to create an organized and functional workspace. The portability of the container allows you to set up your workshop in various locations or take it to events and markets.
8. Music Studio or Practice Room
Musicians often struggle to find a dedicated space to practice or record their music without disturbing others. A garage shipping container can be soundproofed and equipped with acoustic panels to create a private and acoustically optimized music studio or practice room. Whether you’re a solo artist or part of a band, this space will allow you to focus on your craft without any distractions.
9. Guest House or Airbnb Rental
If you have extra space on your property or are looking for a unique source of income, consider converting a garage shipping container into a guest house or an Airbnb rental. These compact living spaces can be designed to include all the necessary amenities, providing a comfortable and stylish accommodation option for visitors or travelers.
10. Classroom or Learning Center
In the field of education, innovative and flexible learning spaces are in high demand. Garage shipping containers can serve as portable classrooms or learning centers, providing a conducive environment for teaching and learning. With proper insulation, ventilation, and technology installations, these containers can be transformed into interactive and engaging educational spaces.
In conclusion, garage shipping containers offer endless possibilities for creative and functional spaces beyond traditional storage. From home offices and art galleries to coffee shops and classrooms, these containers can be customized to suit various needs. So, the next time you come across an unused shipping container, think outside the box and consider the numerous creative uses it can serve.